Showing posts with label treats. Show all posts

Tuesday, June 5, 2012

Grilled Pizza (Grain Free and "Paleo" style)


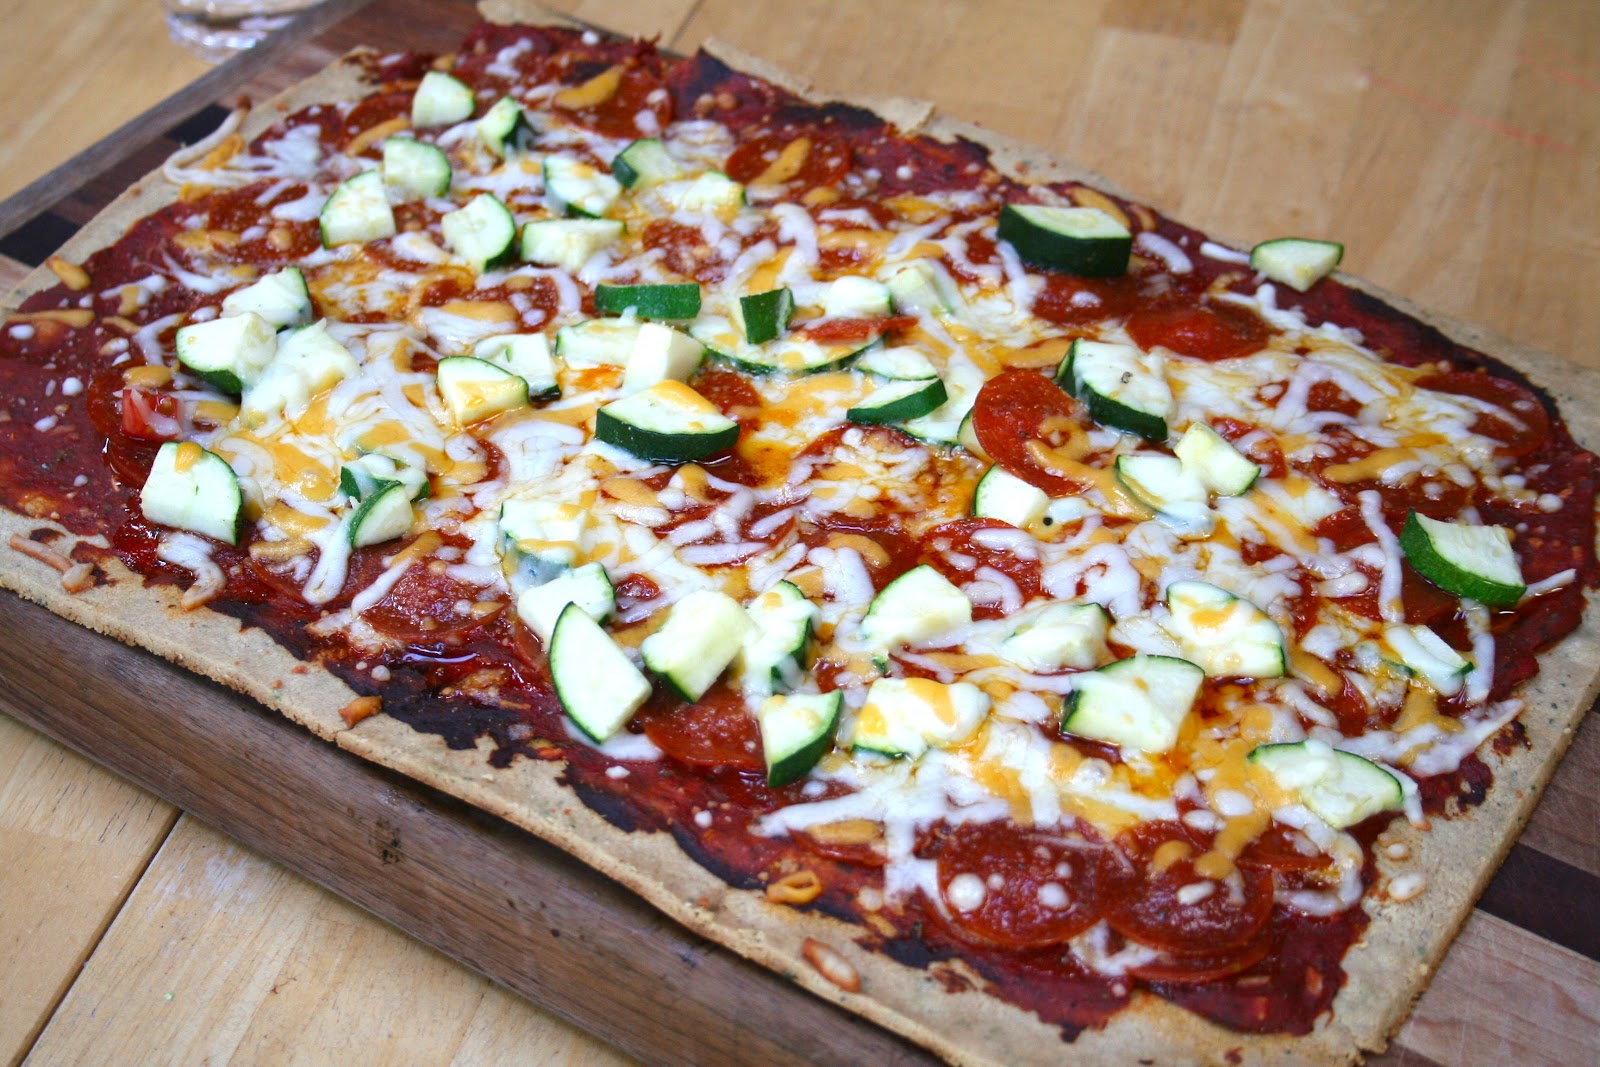
In my last post I mentioned making an effort to let my girls help or prepare meals more often.  The following is the creation of my 9 year old daughter and I, and the photos are of her pizzas.  She mixed the dough first with a spoon and then kneading it with her hands ( she loved that part!).  I then divided the dough and rolled it out for her, we then pre-baked the crust, removed it from the oven and she then put all the toppings on and we grilled them.  Oh, I almost forgot she also mixed up the pizza sauce we used.  This was such a fun treat for them, we used to have pizza quite frequently on Friday nights pre-Paleo, so they really enjoyed it!  We have a large family so we had to repeat this process several times, ( I make triple this, but cut the recipe down for everyone), some we topped with Cheese and others we did not.  For grilled Pizza we like the crust rolled nice and thin and crispy almost like a cracker, Yum!  We hope you enjoy it as much as we do, feel free to change up the herbs and spices to whatever you like, and use your favorite toppings, too.


GRILLED GRAIN FREE/ "PALEO" PIZZA

2 1/2  cups of almond flour (you may need another 2-3 TBSP)
2 eggs
3 TBSP of good extra virgin olive oil (I like Kasandrinos Extra Virgin Olive oil (Kotinos)  )
1/4 tsp baking soda
1/2 tsp dried sweet basil (or any herbs, garlic etc. of your choice)


First thing you want to do is get your grill started, we used charcoal and some leftover mesquite wood chips for ours.  The key is to use very little briquets, you want a really low heat, like really low or it will burn.  Another option is to put most of the briquets on one end of the grill and use more of an indirect heat.  We started out with the rack on the lowest setting and as the coals cooled we just raised them and it worked wonderfully.  
Then preheat your oven to 350 degrees, and combine all of the above ingredients first with a spoon and then kneading and mixing well with your hands.   Next, take 2 sheets of parchment paper ( they need to be about the same size), I buy mine on a large roll from Costco and just tear it to fit my pan.  Take the desired amount of dough, depending on your pan size, and roll it tightly into a ball with your hands.  Place on one sheet of parchment paper on your work surface, then place the "dough" on the parchment paper, flattening slightly with your hands.  Take the second sheet of parchment paper and place over the top of the dough.  Then using a rolling pin, roll in all directions to get the shape and thickness desired (we did both rectangular in a jelly roll pan and round on a pizza pan).  I roll mine really thin (about a generous 1/8 inch), but 1/4 inch should be fine too.  Then remove the top sheet of parchment paper and using the bottom sheet of parchment paper slide the whole thing onto your desired pan (leaving it on the bottom parchment paper). Place in the oven either on the middle rack or one rack up from that (I usually have 2 going at a time and rotate the rack they are on), bake for 15-20 minutes.  Then remove from the oven spread with your Pizza Sauce and top with your desired toppings.  We love to mix it up, but Applegate Pepperoni is always a hit!    Then using the pan just slide the whole thing off onto the grill, and then remove the parchment paper by sliding the pizza off the paper while it is on the grill.  I found that to be the best technique for me, but use whatever works best for you.  Then close the cover on your grill and check it after a few minutes, I like to use a spatula to move it around on the grill so if I have a hot spot, it gets rotated.  Ours took about 10 minutes on the grill and we had our grill  at a really low heat.  Then using a spatula carefully direct the pizza to either the pan you started out with, a cutting board or other surface, cut, serve and enjoy!    This is a great recipe to get the kids involved with, they love mixing, rolling, and making their own pizzas!  Be sure to throw lot's of veggies in there too!  Mushroom, Linsey Natural Olives, tomatoes, peppers, sweet onion, zucchini, artichokes, etc.  


We look forward to experimenting with some pesto, pine nuts, chicken, etc. too later this summer!

*Next time we make this I will try to remember to get photos of the process, I personally love process photos and find them helpful.*


Pin It

Tuesday, May 15, 2012

Grain Free and Paleo friendly Strawberry Crepes/Strawberry Sauce Recipe...


With strawberries coming into season, I've been dreaming of a way to make a strawberry sauce (and Jam) without any boxed pectin or sweetener.  This past weekend I had a beautiful batch of strawberries and thought I would give it a whirl.   The end result was wonderful, and a great addition to our strawberry crepes.  I look forward to experimenting even more with this Strawberry sauce over the summer, I'm thinking it would be good on ice cream, maybe pancakes, or other treats.  I would also like to do some experimenting (when strawberries are in full swing) to see if I can process it in my canner for use later this winter.  Besides tasting amazing,  this is super easy!!  You can make it in a matter of minutes and be doing other things while it cooks. 
 Anyway, I teased you all over on Facebook and made you wait already, so here it is:


For the Crepes:  
I used my standard CREPE RECIPE, but added a splash or vanilla to the mix and used about 1/4 cup of batter per crepe.  I personally do not feel "Paleo" Crepes need any sweetener added to them so I never do, that's what the fruit and sauce are for.
I started out just spreading it in the middle but found just spreading it over the whole crepe worked best.
For the Filling:  
I used plain Greek Yogurt and sliced strawberries. While I enjoyed it, the kids found the Greek Yogurt to tart so next time I might add in a little honey for them.  For a non- dairy option, try making some whipped coconut cream and fill with sliced strawberries and the coconut whipped cream.  

Whipped Coconut Milk Cream: 
 Is what I used on the very top but it could also be used inside with the strawberries.  To make the Whipped Coconut Cream, just skim the thick part off the top of a can of full fat coconut milk.  Some brands are separated when you open them off the shelf and others will separate better if you chill them before opening.  Just be sure NOT to shake it, we don't want it to mix.  Skim off the nice creamy top leaving the thin watery part behind in the can.  Place in a bowl and beat with an electric mixer until desired volume is achieved.


STRAWBERRY SAUCE:


4 cups of roughly chopped ripe strawberries (not overripe)
1/2 cup thawed, frozen apple juice concentrate (do not add water)


Wash and dry strawberries (be sure they are nice and dry), roughly chop (most of them I just cut into fourths).  Measure out 4 cups of the chopped strawberries and place into a small saucepan.  Add the 1/2 cup thawed apple juice concentrate and turn heat to medium.  Bring to a boil stirring occasionally, then let boil for 10 minutes stirring occasionally.  Reduce heat to low heat (like about 3 on my electric range) and allow the mixture to cook down until reduced to about half (again, stirring occasionally).  This will take about 20-25 minutes.  The mixture will start to get shiny and a little more clear looking near the end.  My first batch set up more than my second batch, and the only thing different was the berries, so just keep an eye on it and pull it off when it is done to your liking.  It will thicken up some when removed from the heat so keep that in mind.  Store any leftovers in the refrigerator for later.  
And as always, enjoy!


Pin It

Friday, May 4, 2012

Cinco de Mayo

Tomorrow is Cinco de Mayo, so I thought I would put some of our favorite Mexican recipes together for you on one page, well except the desserts...they aren't mexican, but they are yummy!
From our family to yours, Happy Cinco de Mayo!  


Mexican Slow Cooker Pork (sorry no photo)


Homemade Taco Seasoning (sorry no photo)


Pin It

Saturday, December 24, 2011

Chocolate SunButter Cups

I also made these real quick today for a Christmas Treat...these are quicker and easier than baking cookies.  Dark Chocolate and Sunbutter...mmmm...yummy!


Chocolate Sunbutter Cups

3 pkgs of Lindt 70% dark chocolate (3.5 oz each) or dark chocolate of your choice
1 TBSP Coconut oil

1/4 cup sunflower seed butter (unsweetened)
1/2 TSBP raw honey (optional)

Melt your raw honey and stir into the sunflower seed butter and set aside.  Then in a double boiler, melt your chocolate and coconut oil.  Then remove from heat and line a mini muffin pan with mini muffin liners (foil works best).  Then pour your melted chocolate into a large ziploc bag and cut of the tiniest amount of the corner.  Using your bag, fill each of the cups about 1/4-1/3 full.  Once they are all partially filled, set aside and let it firm up a bit.  After the chocolate is mostly firm, place a small amount of the Sunbutter in each cup (I didn't measure but about 1/2 tsp I would guess).  Then take your bag of melted chocolate and fill the cups the rest of the way, set aside and let the chocolate harden.  And then you have some beautiful and delicious treats!


Pin It

Christmas Treats

In the spirit of Christmas, the kids and I have been making lot's of fun crafts and treats this week.  One that I can share on here is for Gingerbread Men Cookies.  I took a recipe from Elenas Pantry, and made some modifications to meet my preferences better.  For example I subbed Pure Maple Syrup for the Agave, as agave is not a good choice for sweeteners, it is very high in fructose and no better than using high fructose corn syrup.  Please read this article for more information on the differences in sweeteners. I also subbed Blackstrap Molasses for the Yacon Syrup simply because I didn't find any at the Natural Foods store, and then I tried two different batches, one with mostly olive oil and a little grapeseed oil and one with melted coconut oil.  Again, if you are eating Paleo, grapeseed oil is one of the oils that should generally be avoided due to it's high Omega 6 level.  Both ways turned out about the same and tasted great.  If you are going to use the coconut oil, be sure to melt it and have your maple syrup and eggs at room temperature so they don't harden your coconut oil when you mix them together.  
This was a fun thing to do with the older kids, but would be a bit difficult for real young ones.  I did have a little trouble with the dough being real sticky, so added an additional 1/2 cup of almond meal and worked in small amounts.  My suggestion is to roll it out on some parchment paper or silicone mat. I used silicone mat dusted with rice flour and we dipped our cookie cutter in cocoa powder to keep it from sticking to the dough.  I would suggest rolling out about 1/3 -1/2 of the dough at a time, cut out your cookies and the easiest thing would be to leave them on the mat removing the excess dough from around them.  Then transfer the mat or paper to a baking sheet and bake for 15-20 minutes depending on your oven and the thickness of your cookies. I would also suggest chilling the remaining dough between each batch so it's easier to handle.  These are a heavily spiced cookie which is what we really enjoyed about them, however, if you don't like that you may want to cut back some on the spices.  
Another thing I did was to experiment with cinnamon's, one batch I used Saigon Cinnamon and another one I used Korintje Cinnamon.  Both were very tasty, again it is a matter of preference, my taste testers where split, the Saigon Cinnamon gives it an almost spicy kick, while the Korinjte is milder and not "spicy". 

* I read a neat trick for making your cookies cripsy somewhere on the internet, not sure where or I would give credit...when your cookies lose their crunch place in your oven at 170 degrees for an hour.  I tried it today and it works great!  Nice crunchy gingerbread men cookies now! *
Merry Christmas and Happy baking!


Gingerbread Men Cookies

5 1/2 cups almond flour
1 TBSP cinnamon
1 TBSP ground ginger powder
1/4 tsp ground cloves
1/2 tsp Celtic sea salt
1 tsp baking soda
1/2 cup olive oil (be sure not to use extra virgin, just plain olive oil), or coconut oil (see notes above)
1/2 cup pure maple syrup
1 TBSP pure vanilla extract
1/2 cup unsulfered blackstrap molasses
2 eggs
1 tsp lemon zest


In a large bowl, combine almond flour, cinnamon, ginger powder, cloves, salt and baking soda.  In a smaller bowl mix together your oil, sweeteners, vanilla, eggs and lemon zest. Then stir your wet ingredients into your dry ingredients and mix well.
Chill dough for 2 hours.
Preheat your oven to 350 degrees.
Then roll dough out on a silicone mat or parchment paper until it's about 1/4" thick.  Her suggestion is to roll it out between two layers, but that didn't work out to well for me.    Again see my notes above for suggestions on how to make this easier.
If you used two layers of parchment paper, then remove the top layer and using cookie cutters make your gingerbread men (a medium cookie cutter works good).  Decorate with dried fruit and nuts if you like (we left ours plain).  
Either transfer with a spatula or transfer the whole mat/paper to a baking sheet.  
Cook at 350 degrees for about 15-20 minutes.  Remove from the oven when they are done to your liking, then remove them from the mat or parchment paper and cool on a wire rack.  Then you get to enjoy your yummy cookies!


Pin It

Friday, July 22, 2011

A summer treat for those warm days...or just for fun!

We made these a few weeks ago when we were having consecutive sunny days here (been cloudy or raining for a while now).  They are quick easy and so delicious.

Chocolate Dipped Frozen Bananas

Bananas
Dark chocolate of choice for dipping
a little coconut oil
toothpicks
Nuts or shredded coconut for rolling them in

This really isn't a recipe but more a suggestion.  Place a small amount of chocolate chips or chocolate bar broken into chunks along with some coconut oil in a small bowl and microwave for about 30-45 seconds depending on your microwave.  I used about 1 1/2 cups of chocolate chips and 1/2 TBSP of coconut oil, you can just eyeball it.  Stir your chocolate mixture and if needed microwave for a bit longer, until it's all melted.  Peel and slice your bananas into chunks, place  toothpick in one end, dip in chocolate and roll in desired condiment.  Place on wax paper, or I use silicone mats, just something that it won't stick to and that you can peel off.  Place in the freezer and freeze for a couple of hours depending on how frozen you want them.  I left some in the freezer for a few days and then just let them warm on the counter for a bit before eating them. 


Pin It