Tuesday, January 31, 2012

Oh How I LOVE Kombucha!

I started making my own Kombucha a few months ago, after my husband and I fell in love with it's taste.  However, it was so expensive in stores that it was a once or twice a week treat.  We would buy them for each other as little "I love you's".  That was until a friend of mine offered me one of her "mothers/SCOBY's" and then I was hooked.  I actually have two 2.5 gallon containers and a 1 gallon container going all the time now because we all enjoy drinking it and now we can!  Making Kombucha at home is not only easy but very cost effective, a single 2 gallon batch costs me much less than one little bottle from the health food store (around here they sell for about $3.00).  And being fermented it does wonders for gut health as well as being touted as being high in B vitamins.  My kids ask for it and I am so happy to be able to freely give them something so good for their little (and big) bodies.  
My favorite is to stuff some thawed, mashed frozen blueberries in the bottom of the bottle and then some fresh  ginger, mmm...so refreshing and tasty. Or our other favorite is unsweetened cranberry juice and fresh ginger.  Using juice is very economical and budget friendly since you only use 1/4 cup per bottle.  Another money saver I discovered is buying bottled sparkling juices in the flip top bottles, letting the kids drink the contents and then soaking off the labels and reusing them.  I found the bottles to be much cheaper that way ( and I'm paying for more than a bottle).  I can get really large bottles that way and for around $2.00 a bottle I now have some nice 34 ounce bottles.  
My children also enjoy "helping" me to bottle the Kombucha for the second ferment and look forward impatiently to when they can drink it!

 One of my 2.5 gallon Jars.
 My little one gallon jar.
 Supplies to bottle the Kombucha.
 My little 4 year "helper".
 My helper showing a finished bottle ready for the second ferment.
 Kombucha from one 2.5 gallon and the 1 gallon.
 Blueberry Ginger and Apple Ginger Kombucha.
 Apple Ginger Kombucha ready for the second ferment, so pretty!
Blueberry Ginger Kombucha ready for second ferment.
Pin It

Sunday, January 29, 2012

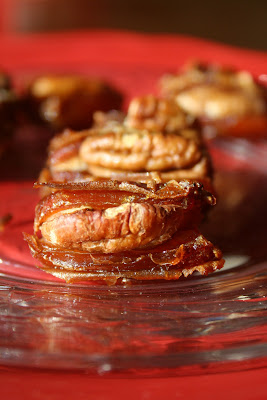
Pecan Baked Dates


This is another repost of an "invisible" post I made for Thanksgiving.

Baked Dates

This recipe is quick and easy and is for those of you looking for alternative to baking pies.  They are super yummy with the carmelized date and roasted pecan.  You could even add a little cinnamon if you like.

Ingredients:
fresh dates, pits removed
unroasted pecans
coconut oil

Preheat your oven to 350 degrees.  Grease a 8x8 pan.  Slice into your dates lenghtwise, being careful not to slice all the way through.  Then place a whole pecan in the slit you made and place it in your prepared pan. When your pan is full or you have made the amount you need place the pan in the oven and bake for about 10 minutes.  Again it depends on your oven.  It may take a little longer, what you are looking for is for the dates to carmelize a bit and the pecan to get a little toasted.  Cool slightly and enjoy!  This are a yummy treat just be careful you don't eat to many!


Pin It

Bacon Wrapped Dates

This is a repost of a recipe I posted at Thanksgiving, my computer was having problems and the post is all jumbled.  You can still find it but some of it is not readable.


Bacon Wrapped Dates
This is a very simple and easy recipe but mmmm...so yummy! 

Ingredients:
fresh dates
Bacon slices
toothpicks

Preheat your oven to 375 degrees.  You may slice your bacon into thirds or in half and then wrap each date with a piece of bacon.  Secure each with a toothpick so the bacon stays wrapped, place in a glass baking dish, keep repeating this step until you have the desired amount of appetizers.  Be sure not to over crowd them in the pan so the can bake well and get crispy.  When your pan is "full" place the pan in the oven and bake for 20-25 minutes depending on your oven.  Be sure to check them frequently near the end and turn them at least once about half way through. They are done when the bacon is browned and looks crispy. Remove and cool slightly and then enjoy!
Pin It